Setting Up Administration Right for Image2Punch
This article is aimed to help the user that using older Image2Punch version. Since the release of Image2Punch Pro version 7.1.1 and above, the user can select the installation mode only for a single user which does not required them to set the Administration Mode. However, if the user select the installation mode where all user can use Image2Punch in the Computer, enabling the administration right is still needed and the following information will be applicable.
Image2Punch application needs to create, delete or modify file in the folder inside the Program Files folder. The reason to perform this tasks are to save the setting preference and make a setting backup so the application can run seamlessly. However, if a user does not have enough privilege/ administrator right, running Image2punch can create a run-time error. This is especially true when installing Image2Punch in Windows 7 and above.
The illustration below is a dialog box that pop up when running Image2Punch without enough administration right for particular user/group.

In order to avoid any run-time error because of not enough administration right for particular user, there are two ways to manually setup administration right as described below.
Manual Set Up Administration Right
After installation of Image2Punch, you need to go to its folder. It is normally kept in C:\Program Files (x86)\Image2Punch Pro 7.0.0. Then right click on The Image2Punch folder as illustrated below. Then click the Property Menu Item to open the property dialog box.

As soon as the Image2Punch’s property dialog box is open, click the Security Tab and select the user name as illustrated below. Then, you need to click edit to modify the administration right for that particular user/group.

After clicking the edit button, another dialog box will pop up. Then, re-select again the user/group and click the Modify checkbox to allow this particular user or group to have a right to modify files in this folder. After that, you need to click Apply Button to ensure that the change will take effect immediately.

After that, we can see that the modify has been checked on that particular user/group. Click OK button to complete this administration right setup. Then you can run Image2Punch.

Run As Administrator Mode
The second way is to always run Image2Punch as an Administrator. However, this second way is not recommended by most software deployment and maintenance people as this is not a feasible way. This is especially true for a big company that has a very strict administrative permission environmental.
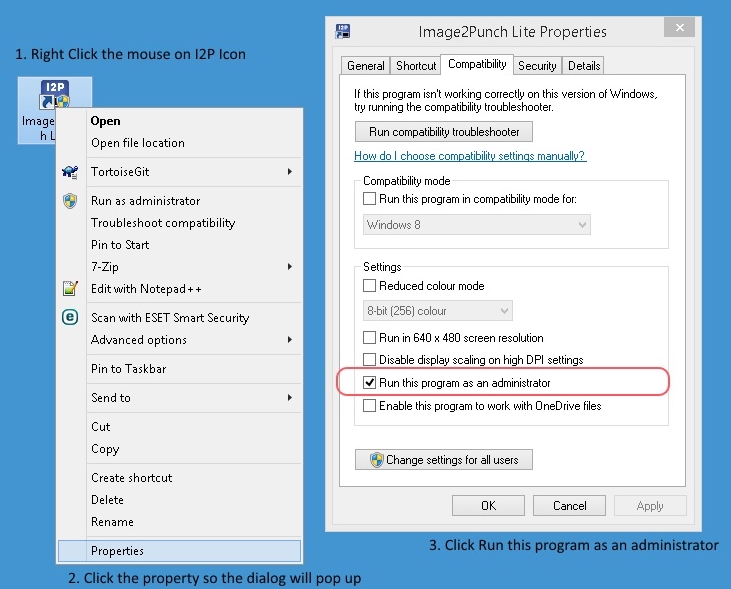
In order to run Image2Punch in Run As Administrator Mode, you need to open the property dialog box of Image2Punch by right clicking the Image2Punch Icon. Then select the Compatibility Tab and check the Run this program as an administrator. Then click OK button to complete this setup.


