Cluster Tool Recognition with Custom Tool
Tutorial Limitation and Boundary
This Tutorial is dedicated to Image2Punch’s users who want to implement the cluster recognition feature in reducing the number of tool hits for manufacturing image-based perforated sheet metal on a CNC Turret Punch Machine. This tutorial is especially re-created and modified from existing tutorial for the use of custom cluster tool.
However, this tutorial discusses only the calculation and step-by-step procedures in using cluster recognition feature from the design concepts up, importation of a DXF file, then to the generation of DXF file produced by Image2Punch software. General information is also given when the a DXF file containing the desired image-based perforated pattern with cluster recognition is used to generate the CNC code by using CAD/CAM Turret Punch software.
This tutorial does not discuss the step-by-step procedures in generating CNC code from dedicated CAD/CAM software for Turret Punch as well as the procedure in manufacturing perforated sheet metal by using cluster punch. All the information regarding those techniques and procedures can be obtained from your CAD/CAM software and the technical manual guidelines of your turret punch machine as well as the supplier of your cluster punch tools.
Creating Custom Cluster Tool
Before you can use the custom cluster tool, you firstly need to create and draw the tool in CAD software ( e.g. AutoCAD or ProgeCAD) and save it into a DXF file format version 2000 as Image2Punch can only read the file I this format. All the dimension, hole and the spacing for your custom cluster tool has to match your physical true cluster tool that are available in your workshop. After you draw it, you need to ensure that the centre point of the tool should be as close as possible to the origin location which is 0,0. However, it does not need to be exactly on the (0,0) location. All other information, shape, dimension and text should not be include in the DXF file.
For this example, I create a unique custom cluster with 10mm for the spacing between the holes in horizontal and vertical direction. Then using a uniform 10mm diameter hole for all the holes. Lastly, I saved it in DXF file format as illustrated below.

Importing into Image2Punch
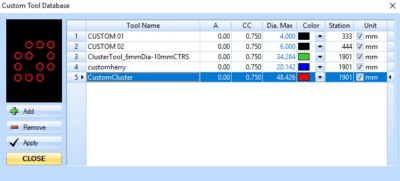
To import the tool into Image2Punch Pro, you need to click the Custom Tool Database, then click Add to open a dialog box where you can select the DXF file. After that, click OK and another dialog box will come up. This dialog box is where you need to put all information regarding this new tool.

When the Import DXF Geometry dialog box come up, it will show the graphical information of the custom tool. The filename will be used as the custom tool name in the library. However the user can freely rename it into other name and change the color of the tool. Other important step is to detemine the unit measurement for this tool. If the unit is in mm, you need to tick the mm button, otherwise click the inch button.

After the user click ADD TOOL button, the custom tool will be added into the library. Then the user also need to click Apply to ensure that this custom tool will be saved into the system and can be used when creating another project or image.

Importing into Image2Punch
To import the tool into Image2Punch Pro, you need to click the Custom Tool Database, then click Add to open a dialog box where you can select the DXF file. After that, click OK and another dialog box will come up. This dialog box is where you need to put all information regarding this new tool.

When the Import DXF Geometry dialog box come up, it will show the graphical information of the custom tool. The filename will be used as the custom tool name in the library. However the user can freely rename it into other name and change the color of the tool. Other important step is to detemine the unit measurement for this tool. If the unit is in mm, you need to tick the mm button, otherwise click the inch button.

After the user click ADD TOOL button, the custom tool will be added into the library. Then the user also need to click Apply to ensure that this custom tool will be saved into the system and can be used when creating another project or image.

Calculating the Perforated Pattern Parameter
To determine the perforated pattern configuration in order to use the custom tool, user need to use the same pattern as the cluster tool itself. In this example, the tool has spacing of 10mm from centre to centre of the holes. It also use 6mm diameter holes. Therefore The largest tool will be 6.0mm Diameter holes and the minimum gap between the tool will be 4.0mm ( 10mm – 2 * Largest tool radius). Also the Pattern to be used will be rectangular pattern with equal spacing between horizontal and vertical direction. To sum up, the cluster tool will determine 3 factors when choosing the configuration of the perforated pattern;
- The Pattern Type (either rectangular or angle pattern)
- The largest hole for selected tool
- The Minimum Gap between the tool
Generating the Perforated Pattern
After we calculate and determine the essential pattern parameter, now it is the time to generate the pattern. The other round tools that I have selected to generate the pattern are 2.0mm, 3.0mm, 4.0mm, 5.0mm and 6.0mm. Other parameter will not be changed and stay as is.

From the generation, we can know that this pattern consist of 32600 holes and the Largest diameter consist of 22649 holes. At the current pattern, the custom cluster tool which consist of 12 holes has not been implemented yet. For getting to know more information from this pattern, the user can also click the statistic report.

Implementing Custom Cluster Recognition
In order to perform cluster recognition, we need to click the cluster tool button in Tool Selection Group in The Tab Navigator. Then, we need to click the Select Cluster Tool Button. After that, another dialog box will be open and you need to select the newly made custom cluster tool which is named as Customcluster. The Cluster recognition optimization will be left as 1 and 1. The purpose of this optimization is to increase the speed of calculation by dividing the area or recognition into smaller segment. For example, if we define 2 as the value for horizontal and vertical segmentation, then the total segment will be 4. Therefore, the more segment, the faster the calculation. The drawback is the recognition will not obtain the optimal number of recognition.

After this process done, we can see that the red area of the pattern is the custom tool that has been used to replaced the holes in that area. From the statistic Report, we also know that there is 8195 tools has been eliminated and replaced by using the custom cluster tool. The total custom cluster tool that has been used is 745 and this means that the total punch hits has been reduced around 36% when the cluster tool is implemented and used. The less punch tool hits when manufacturing the perforated sheet, the easier and faster the process.


Saving The Pattern in DXF File
Before we save into the DXF format, we need to open the Setting Preference dialog box to adjust the output file setting. In the case of activating the cluster recognition tool, we need to create separate layer for each tool type. This mean we need to checked the layering option on the setting preference. After that, we can save it into DXF file format by clicking the menu item on File Menu.


Preparing the DXF to be used for CAM Layout
A post DXF generation procedure may be performed to hide or delete the cluster tool and leave its center tool only which has the specific diameter size. This specific diameter size will be then used to locate and position the cluster tool during the toolpath generation in user’s CAM application such as Jetcam or Cadman. An example when all the cluster tool has been hidden or deleted in a CAD application and leave the center tool only can be seen in the illustration below.


